Archives for handiwork (page 2)
August 15, 2004
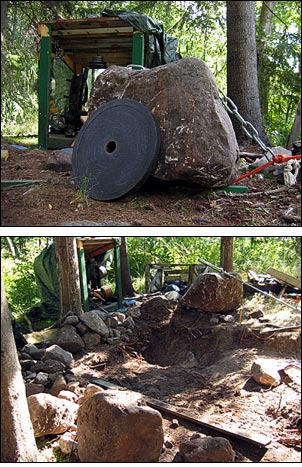
Unearthing rock at Toffe’s Gym
Spent the weekend up at the summer cottage on Project Power rack. The rack itself had not been welded yet, but I had my hands full unearthing rocks of all sizes to make room for the lifting platform. The Ice Age seems to have left the soil of this particular patch of Ostrobothnian forest about 60% rock, while not neglecting to dump a big one right where I want my rack.
After I removed the soil around the huge boulder, a task made tedious by the unfortunate amount of surface roots, I realized that only about a fourth of it had been visible above ground (see the far left of the picture in this entry). After I did some futile preliminaries with an iron bar as a lever, my dad suggested we try get it up of the hole with our small winch fastened to a nearby tree. The benching chains came in handy here, but it took several attempts before we found a rope that would not snap as soon as we got the boulder going. Up it came at last. I opted to leave it quite close to the future rack as it will make a great table for my training notes and whatnot. Besides, it goes well with the general spirit of this outdoor gym.
August 1, 2004
Rack welding schedule
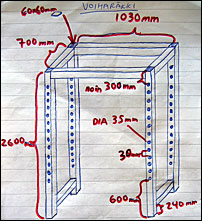 Our summer cottage neighbor, the one with the construction company, came over as agreed. He will have one of his guys weld the rack soonish. The hourly rate is 24 euro excluding tax and the job is estimated to take about four hours. I left the welder exact plans of the rack, its hooks and the bench. Once the rack has been welded, I will return to paint it and, hopefully, put the rack into place. There is a big boulder trying to prevent me from putting the rack where I want it, so will either need to do some rock demolishing, move the rack or call Steve Jeck. I actually have a demolition license, an inheritance from my compulsory service in the Finnish army as a field engineer sergeant, but don’t think I will dynamite it although it would be a blast.
July 29, 2004
July 27, 2004
Purchasing power rack and bench material
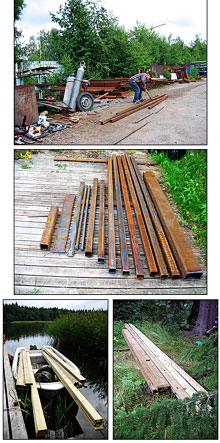 Although somewhat later than planned, a suitable opportunity to embark on the power rack and bench upgrade for Toffe’s Gym finally presented itself as a neighbor was kind enough to lend us his trailer. Yesterday, after driving off a decade of metal junk and other waste to the tip, we took a detour via the junkyard. As I had bought my chain there a few weeks ago, I knew the owner had a batch of suitable iron pipes for sale dirt cheap. Besides costing a mere fourth of the retail price, the only difference between the junkyard and the hardware store was that these came with a very thin layer of surface rust. After a quick polish and a layer of paint, they will be as good as new.
For the power rack I bought 60x60mm/2.4x2.4″ pipe with a 3mm/0.1″ wall thickness for the main frame, two pieces of 30mm/1.2″ iron rod for the support pins, and some larger pipe and thick strips for the adjustable uprights. In a gothic twist, I decided I wanted a monstrous bench and bought a 100x150mm/3.9x5.9″ pipe with a whopping 10mm/0.4″ wall thickness for its main frame. I suspect the finished bench will weigh close to 50 kg/111 lbs, but in return it should be safe to use even for those 400 kg/884 lbs benches that I like to do in my dreams. In fact, another customer I spoke to was buying the same pipe for use as the main support beam for a large roof… The junkyard guy was willing to cut the pipes into pieces according to my requirements for free, but since he used gas the rough edges will need to be trimmed before welding. At a total of 140 euro, the price was not half bad considering that I should now only need some paint and bench padding. An hour and a boat ride later, the pieces lay spread out on the wooden platform I use for my ball work. As both triceps and delts were still tender from the initial shock of the first Blakley accessory day on Friday, this was all the exercising I did.
Today it was time for the lumber yard. Dad needed material for renovating the interior of our old wooden boat, a former life boat on cruiser, and I needed boards for the base of the power rack. I found some suitable 97x20mm/3.8x0.8″ boards at a suitable discount price of 0.8 euro per meter/3.2 feet plus some 155x55mm/6.1x2.2″ support beams for some 3 euro per meter/3.2 feet. Paid 40 euro for all 50 meters/164 feet of wood. Everything is impregnated and should thus easily last for a decade or three. As I loaded the boards on the trailer I had flashbacks of when I slugged my lumber around using public transport. Life is easy now.
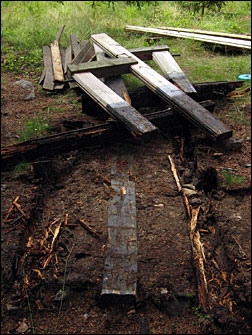
On Sunday, the welding timetable is going to be agreed on as another of our neighbors is going to come over. He has his own construction company and has agreed to send over a welder to both replace some windows in our main house and weld the gym equipment. Sunday is also the day Sanna and I need to go back to Helsinki as my vacation is over, but the plan is for me to come back some weekend to assemble everything. Needless to say, I need to prepare some very clear instructions for the welder so I don’t return to find the uprights welded upside down or the rack sawed down to a midgety 1 meter. I will do some preparatory work on the platform in the next few days - since the rack is going to be secured with concrete underneath the base I cannot do too much before the rack is welded and put in place. Plans etc. will appear later.
July 25, 2004
Donkey calf machine unveiled
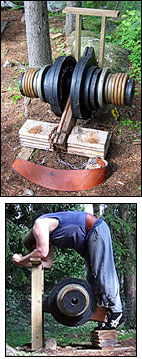 In my quest for spinal stability and grip strength my calves have disappeared in the shadows. From here on I pledge to remedy that. After some lunges and the standard rehab work, I thus removed the plastic that has protected my homemade wooden donkey calf machine from the last two winters. It looked as solid as the day it was built. Quite a lot of weight can be moved on this one, so worked up to four sets at 226.8 kg/501 lbs, which is about as much as I can load on it unless I get more big plates. Back in my bodybuilding days, when there were less plates at Toffe’s Gym, I used to have the nearest person jump on my back for extra resistance. But with only a few workouts left here this summer I don’t think that will be an option.
And now for something completely different… NOT! A clip (1.29MB).
Lunges, alternating: 3x10 @ 30 kg
One-legged balance board standing: 2x1 minutes
Muscle activation standing one-legged on balance board: 2x1 minutes @ 2 kg/4 lbs
Balance board lunge: 15
One-legged toe touch on balance board: 20
Arm and leg extension kneeling on stability ball: 10
Walk out with trunk twist: 12
Low plate twists: 2x10 @ 15 kg/33 lbs (first set slow, second normal aka fast)
Side bends on stability ball: 20
Neural mobilization holding feet: 10
Donkey calf raise machine: worked up to 10,10,9,8 @ 226.8 kg/501 lbs
Total training time: 70 min
June 24, 2004
Bring on the chains!
One of the things I decided when embarking on Westside training was to do at least a full year of basic training before even considering chains, bands, weight releasers and other such intensity boosters that have become something of a hallmark of the Westside school of powerlifting. It is not only because these gadgets are too advanced when just making the switch to powerlifting, but also because I wanted to save them for when my gains started slowing down. Simply put, don’t use the sledgehammer until you really need to. Having heard many people rave about what chains and bands did for their bench, I think it is now time to see if they can help me get out of the rut.
Chain theory and contrast with bands
Thin loading chains are used to hang thick chains from the bar sleeves and adjusted so that most of the heavy chain is on the floor at the bottom of the movement. What chains do is to progressively increase the resistance towards the lockout as more and more chain leaves the ground. In Westside terms, this is a way of accommodating resistance, of making the strength curve better match the resistance. Movements on which the chains are used usually get easier towards the top due to better leverage towards lockout and acceleration off the bottom. The chains offset this lightening, thus ensuring that the lift remains heavy to the [bitter] end.
Chains are especially valued for speed work as they force the body to accelerate against increasing resistance. Not only does this make the lift challenging, but, according to Westside theoreticians, the added resistance also forces you to drive the bar higher before starting the largely unconscious deceleration phase that stops you from either throwing the bar or injuring your elbows. Without chains (or bands) the bar simply moves too fast at the top forcing you to step on the break sooner so you have time to stop the bar. This dilemma can’t be solved by adding more weight to the bar, since the lift would then be too heavy at the bottom making the degree of acceleration insufficient for speed gains. With chains you have only the bar weight at the bottom and 10-20% extra at lockout. By allowing you to drive the bar higher at high speed, chains help produce a favorable neurological response that will teach the body to drive through sticking points with max weights.
Chains are also used for max effort work on such movements as floor presses and good mornings. As bar speed is low compared to speed work, the neurological response is largely lacking. But as chains make the movement harder, the muscles need to strain more thus leading to larger overload. Time under tension with heavy weight, an essential component of strength gain, is increased as it takes longer to complete the 1-3 reps than without chains. Chains can also be used in max effort work to combat specific sticking points by adjusting the loading chain so that the extra weight kicks in just below the problem.
The effect of bands (and bungees) is similar, but, unlike chains, the resistance does not increase linearly but exponentially as the resistance grows stronger and stronger the more the band stretches. Bands also create much more eccentric tension, i.e. it not only adds weight but also pulls against you. Drop the bar with chains and it fill “merely” fall on you, drop it with bands at it will be propelled down at you as if from a slung. Bands also tend to add more resistance than chains, i.e. in the neighborhood of 20-30% of bar weight at lockout on speed work. If chains are a semi-advanced method, bands are highly advanced and should not really be used extensively before reaching a plateau. At Westside, chains were introduced only in the late 1990s long after the club had reached fame, with Jump Stretch bands making their appearance a good three years later. These strong guys and girls certainly got their base strength from plain old straight weight before going for chains and bands. Barbender242 put it well over in the T-nation forums:
Chains and bands are just two more weapons in your battle to gain strength. I think too many new lifters want to do everything and use everything at once. When beginning, go ahead and cycle some chains in, it will help with lockout weaknesses. But the best advice on bands came from Chuck V., he said that you should not use bands until you have completely stopped gaining from straight weight and chains (for most people, this is longer than you think). That way by the time you get to the point where you need to use bands, you already have a solid training base and the bands will get you jump started to even bigger numbers. The problem is when you have people who have just started training and are nowhere near any type of plateau, trying to get under band tension without a solid base.
No bands for me for at least another year. Might be difficult as I ordered a pair of minis for use with GHR assists and rehab work.
Chain loading
Below is the recommended chain weight chart for speed work, an amalgam of this and that, to use with speed box squats and speed benching on top of what straight weight you would normally use for speed work. Recall that bar speed is ultimately the indicator, i.e. if you can’t complete three reps within three seconds you have too much weight on the bar and/or too much chain.
| SPEED BENCH | ||
| Raw bench max | Chain weight at lockout | Sample chains by link size |
| Under 200 lbs/91 kg | 20-30 lbs/9-14 kg | one 1/2″/13 mm |
| 200-400 lbs/91-181 kg | 40-50 lbs/18-22 kg | one 5/8″/16 mm |
| 400-500 lbs/181-226 kg | 60-70 lbs/27-32 kg | one 1/2″/13 mm + one 5/8″/16 mm |
| 500-600 lbs/226 kg-271 kg | 80-90 lbs/36-40 kg | two 5/8″/16 mm |
| Over 600 lbs/271 kg | 100 lbs/45 kg | one 1/2/13mm + two 5/8″/16 mm |
| SPEED BOX SQUATS | ||
| Raw squat max | Chain weight at lockout | Sample chains by link size |
| Under 200 lbs/91 kg | 40-50 lbs/18-22 kg | one 5/8″/16 mm |
| 200-400 lbs/91-181 kg | 50-60 lbs/22-27 kg | one 1/2″/13 mm + one 5/8″/16 mm |
| 400-500 lbs/181-226 kg | 60-70 lbs/27-32 kg | one 1/2″/13 mm + one 5/8″/16 mm |
| 500-600 lbs/226-271 kg | 80-90 lbs/36-40 kg | two 5/8″/16 mm |
| 600-800 lbs/271-362 kg | 90-100 lbs/40-45 kg | one 1/2″/13 mm + two 5/8″/16 mm |
| Over 800 lbs/362 kg | 120-140 lbs/54-63 kg | three 5/8″/16 mm |
Note that my Westside Barbell DE Bench Guidelines script can make all the calculations for you. Generally about half of the 5 foot/1.5 meter chain will be on the floor at the top of the lift, which is a good rule of thumb if you need to find out how much weight a certain chain will add to the lockout.
For max effort work more chain would generally be used, having up to 50% of the weight come from chains is not uncommon. There are two basic ways of working with chains for max effort work: 1) work up to 50-80% of max and then add chains to failure, 2) add a set number of chains first and then add weight to failure.
Setting up chains
The same set of chains can be used for all lifts by simply adjusting the length of the loading chain to satisfy the rule that most, if not all, of the heavy chain should be on the floor at the bottom of the lift. The exception is floor presses, where the chain is draped directly over the sleeves as the bar is too near the floor for loading chains to make any sense. Here is the setup directions straight from the big horse’s mouth as given for box squats:
To set up the chains you’ll need a five foot 1/4 inch chain to act as the support chain. This chain is suspended from the bar sleeves. A metal ring will be suspended in the 1/4 inch support chain. Then the training chains (five feet long, either 5/8″ or 1/2″ thickness) will pass through the metal rings so one half of the chain falls on each side of the ring. You’ll set the support chain so three links on each side of the training chain are on the floor at the top of the lift. When you sit down on the box most of the training chain will be on the floor. You have to keep a certain amount of the chain on the bar to avoid the chains swaying back and forth throughout the movement.
A man and his chain
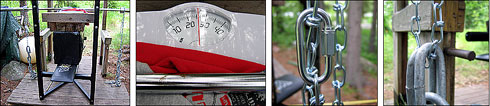
My plan is to first add the chains to the speed bench. When I have a power rack at Toffe’s Gym, I will also alternate with doing them on ME exercises like floor presses and benches. While surveying material for the rack, I stumbled upon a guy selling 1/2″/13 mm chain. Although I should be using a 5/8″/16 mm chain, I figured they would be good for easing into chain benching. I ended up paying 28 euros for two pieces slightly longer than 5 feet/1.5 meters. It took another 6 euro for two 5 feet/1.5 meter pieces of thin loading chain and two attaching links before the package was complete. I have a feeling 5/8″/16 mm chain will be more expensive if I can find it. Elite Fitness Systems sells these for $99.95, but the shipping would kill me.
Being as anal as always, I did not want to rely on the math to find out how much weight the chains add to the lockout. After adjusting the chains to a suitable length, I had Sanna determine how high the bar is off the floor at the bottom (71 cm) and the top (112 cm, I have a 41 cm stroke with my current minimal arch). Next, I piled enough junk on my soon to be retired Weider bench so that I could get a scale up at the 112 cm mark. Then weighed the bar (19 kg/42 lbs) and added the chains. The final 26 kg/57 lbs reading told me that the chains added 6½ kg/14 lbs to the top. I gather that a 1/2″ chain with smaller loops would reach the full 9 kg/20 lbs generally expected of a 1/2″/13 mm chain. Tomorrow it remains to try them out.
Recommended readings
Chain Reaction: Accommodating Leverages by Louie Simmons. The classic article, which has some interesting things to say about the neurological effect of chains. “Training with chains in this manner accomplishes three things. 1) We have maintained our original weight in order to use the correct percentage for explosive training. 2) We have overloaded the top portion of the lift, which normally does not receive sufficient work because of increased body leverage at this position. 3) A neurological response to build explosive strength is developed. This training will train you to drive to the top because you cannot slack off at the top phase as you used to.”
Accommodating Resistance: How to use bands and chains to increase your max lifts by Dave Tate. A pocket bible on the topic. “I don’t care how you lift the weight, at some point you have to begin to decelerate. If not you’d have to actually throw the barbell. Now at what point do you begin to decelerate? Is it at three or four inches before the lockout, or three to four inches off your chest in the bench? I don’t know for sure, but I can guess it’s different for everyone and is based on several individual things such as joint angles, fatigue, and previous training experience. Bands and chains can train you to break through these sticking points.”
Chains and Bands by Louie Simmons. Talks about loading in detail. “If you want to excel at powerlifting or any sport, then you must develop speed strength, increase acceleration, and gain absolute strength. Bands and chains can be instrumental in developing these aspects of strength. I highly recommend that you try them as soon as possible.”
Researching Resistance by Louie Simmons. “This is exactly why you must use bands or chains to accommodate resistance [when doing speed work]. Without them the bar moves too fast at the top.”
Workin’ on the chain gain?and more by Ken O’Neill. Excellent article with pictures that also discusses purchasing chain and has a nice chart of how much various thickness of chain weigh by the foot. “Chains provide a low cost way of doing what Arthur Jones set out to accomplish with his original Nautilus machines.”
Bands, Chains and Bungees by Bob Strauss (photos). “Chains operate differently than bands or bungees. They add the exact same amount of weight per unit of distance moved, whereas bands increase, and bungees increase further. The fact that chains start adding an even amount of resistance make them good for helping a point lower down than bands or bungees.”
The Science Behind Bands and Chains by Rob Haan. “Is the use of bands and chains some magical tool that will create supermen? No, the process of getting stronger is slow and takes years of hard work, bands make the work harder not easier. The bands and chains are just a way of stimulating the muscle in a different way and changing the strength curve and the force velocity curve.”
June 13, 2004
Making a balance board
 The usual post-winter chores at our summer cottage involve a fair share of lifting in the form of boats, bags of fertilizer for my dad’s countless roses and furniture that wants to come out in the sun. Nothing super heavy, but I was slightly afraid the highly repetitive lifting would be a little too much for my back. Happily it wasn’t.
On the training front, I have occupied myself with thinking about how to best upgrade Toffe’s Gym to an outdoor powerlifting mecca. One of the most urgent additions is a stability ball for my rehab and stability work, but unfortunately I could not locate a ball in the city that was guaranteed to be both burst-proof and loadable to at least 300 kg/663 lbs. Am going back to Helsinki for a few days tomorrow, so will get one there.
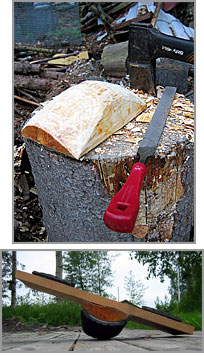
With no ball and no cable machine, I summoned Kris the carpenter and set out to construct a balance board that I could do the prescribed bodyweight squats on. After extensive prototyping, I ended up splitting a piece of alder in two with the axe and tapering down the sides of it so that it would rock not only sideways but forward and backward as well. Next I molested an old car tire to get a suitable piece of rubber to drape the piece of wood in. After all, this balance board should be stable in outdoor conditions, even in the eventuality that it has rained. Finally, I nailed a board on top of it and put some more tire on top of the board for the feet. Thus the All-weather Balance Board was born.
Today’s mini clip (520 KB) should give you the general idea of how this board behaves. Although I did eventually manage to do a few bodyweight squats on it without touching the ground, it will be a challenge to get comfortable on top of it. Stability training is never boring, let me tell you. Think I will try side raises standing on the board tomorrow as part of the first hardcore outdoor session of the year. Until then, remember that whatever the road conditions, the All-weather Balance Board delivers.
December 17, 2003
Plane 95KG now boarding
 This entry is added somewhat late; I hope to pacify the hordes of angry readers with this picture of the boards I use for benching (the hordes are also very gently reminded of the power of RSS). The courageous story of how these boards were made has already been told.
The temptation of bettering last week’s videotaped benches was hanging in the air today as I had been so close to inching 100 kg/221 lbs to lockout (surely, 97.5 kg/215 lbs would be easy). But variety is the spice in both life and training, and why attempt a very close 100 kg/221 lbs now when I surely can smoke it anytime later after a few weeks of other movements? This was a great opportunity to practice ego restraint and let the training have its own course… booooards!
While waiting for one of the two benches to become vacant I had the pleasure of seeing a guy do 70 kg/155 lbs speed box squats off my squat box and spotting a friendly guy who after saying that he might not be able to handle 150 kg/332 lbs proceeded to bench three fairly easy reps.
In the spirit of adding more grip widths to my ME movements, a close-grip was the order of the day. Equal to my current bench max and 5 kg/11 lbs more than my last two board max with a wide grip, 95 kg/210 lbs was easy. The magic 100 kg/221 lbs was about as far away as the moon or Timbuktu.
I will skip DE squat on Sunday, as trying to do speed work just does not seem relevant to me in my current condition. In a week or two I might be able to start light box squats as my back is doing better by the week and sitting is now largely pain free.
Close-grip board press, two-board:
5 @ 50 kg/111 lbs
5 @ 60 kg/133 lbs
3 @ 70 kg/155 lbs
3 @ 80 kg/177 lbs
1 @ 90 kg/199 lbs
1 @ 95 kg/210 lbs
Lying Tate press: 4x6 @ 18 kg/40 lbs
Kraftwerk one-handed row: 2x10 @ 110 kg/243 lbs
One-handed cable front raise:
6 @ 20 kg/44 lbs
14 @ 15 kg/33 lbs
One-handed cable side raise:
6 @ 20 kg/44 lbs
12 @ 15 kg/33 lbs
Kraftwerk triceps extension: 15 @ 8 plates (unmarked)
Total training time: 60 min
October 13, 2003
Shopping for boards
Wednesday will be the day when I finally introduce the board press into my workout. Alas, no board presses without boards. Time for board shopping!
Located a lumber yard close to work by browsing the yellow pages (the web is not everything yet, being computer-oriented I tried there first until an older colleague reminded me of the existence of the old fashioned phone book). Since Dave Tate recommends using 2x6 inch boards that are 14 inches in length, this is what I asked the lumber guys: “hi, do you have any 2x6 inch boards?” Although inches are often used when talking about nails and such, Finland basically follows the metric system. What I got was 4.8 cm x 14 cm (1.9x5.5 inches). Good enough.
What wasn’t good enough was the fact that they refused to sell me anything less than an uncut board. The boards being 6 meters/9.7 feet in length I had some concern about how I would get them home, not having a car glued to my behind. Bought the whole thing for 17 euro (almost $20) and had it sawed into three pieces. Threw them on my shoulder and walked close to a kilometer to the nearest bus stop (for some not so inexplicable reason, lumber yards insist on being located in the middle of the woods around here). Once the bus arrived I hoped the driver would let me in. He did, although he must have thought it over since these pieces were long enough to put a dent in the roof. Getting off the bus, I took another long walk home with my new board friends. There is something slightly out of place with walking around in an urban milieu carrying a load of boards over the shoulder. Seemed like it wasn’t only me and the bus passengers who thought so.
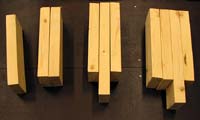
Since I had a load of boards, I decided to make separate one boards, two boards, three boards and four boards by nailing individual boards together (as opposed to just getting four pieces that could then be stacked on each other as needed). Therefore I needed a total of 10 boards. Since anything thicker than a two board is pretty thick to hold on to, I made one of the boards in both the three and four boards 18 inches/45.7 cm long so they could function as handles if need be. Found some heavy duty nails perfect for nailing the boards together with. After some work it was time for vacuum cleaning the balcony, now thoroughly covered in saw dust. Behold, my new boards! With ever increasing frequency I am wishing I had a digital camera. Hope you have a vivid imagination.
Found a big bag to pack all of them in. Well, big enough. Although they were sticking out they were at least mostly in the bag. Left the unused pieces of board behind me and headed for the gym with my bag. Once I arrived it was already too late for my ME Squat/Dead workout (possibly just as good, as my lower back was still somewhat sore), but at least I got my boards in position next to the power rack. Wednesday on my mind. See you then.
May 17, 2003
Mine is 13 inches
My plan of starting technique training on Friday was foiled by never-ending rain and hard wind. Why rain matters is that I’m currently at the family summer cottage on an island, where I have a nice gym at the edge of a forest. Although I have in the past trained in the rain, even once in the middle of the winter, I figured this wouldn’t be the best environment for learning box squatting. Rain curls and super-slow winter squats are one thing, sitting back on a box with the shins less than vertical quite another; something I noticed first hand when I did the workout today in a partially wet squat rack. With the weight so far back, box squats put higher demands on the surface, even with the very light weights I used to train technique.
Sakari Selkäinaho sums up the basic box squat form as follows (my translation):
1. Sit back far enough to put the shins at least perpendicular to the floor, preferably past.
2. Stop on the box and relax the muscles of the hip region.
3. Keep the trunk muscles tensed at all times.
4. Explode off the box as powerfully as possible.
5. Use an overly wide stance and keep the feet pointed as straight forward as possible.
6. The bar should at all times be in line with the heels.
The benefits (summed up from the links at the bottom of this post):
1. More stress on the squatting muscles (hips, glutes, lower back and hamstrings) than in the normal squat; as a result the size of the quads might shrink some doing only box squats, but the hams will most likely grow.
2. Faster recuperation than normal squatting (sounds promising)
3. Teaches good form and to always go below parallel
4. Increases flexibility if performed off low boxes
Naturally, the ideal box height depends on how tall the lifter is. The normal recommendation is to use a box 1-2 inches (2.5-5 cm) below parallel (i.e. below the point where the crease of the hip is in line with the top of the knee), but sessions are also done on boxes lower than that, at parallel or above parallel. The one I put together on Friday is exactly 13 inches (33 cm), which puts me roughly 2-3 inches below parallel (rough estimate, I need someone else to do a visual for me). I figured I’d make it low enough, then I can easily raise it by putting a plate under it if needed. Being used to squatting rock-bottom I figured I might just as well learn to box squat fairly deep, so I decided to stick with the 13 inches for now. This way it will feel like a vacation when I squat off higher boxes.
But to the workout:
Speed Box Squat, 13 inch box: 10 sets x 2 reps @ 30 kg/66 pounds
Speed Deadlifts: 6 sets x 1 rep @ 60 kg / 133 pounds
Total training time: 25 minutes
Did the workout with extremely light weights in order to concentrate on technique and make sure that I wouldn’t cause any soreness that might interfere with my ME (max effort) Squat/Deadlift session on Monday (after all, I do have one day less to recuperate due to the rain?). As dictated by the Westside protocol, I did the reps as explosively as possible on both the box squat and the deadlift (after all, the whole point is to train explosiveness on Dynamic Effort days). And oh boy, was it nice indeed! Made me feel like putting some real iron on the bar and keep going, but of course this was not the time. Especially the deadlift felt great, but then again, I’m a Finn. I though the grip with one hand reversed would feel strange, but actually it didn’t. It’s going to be interesting to see how much weight my forearms can handle? rowing with 115 kg and pull-downs with 105 kg I can handle, but only barely. Needless to say, my 150 kg deadlift I mentioned in my previous post was using straps, and strictly speaking does not count as a proper result in this regard (in which case I believe I’ll be breaking my deadlift PR pretty soon).
The box squats felt good. The box needs to be placed fairly far back since the idea is to sit back (put it just behind you and you’ll probably tip it backwards). The forward lean is quite extreme, but then that’s the point in order to overload the key muscles. If you don’t lean you won’t get back up with shins at that angle. I also like the box for the same reason I like rock-bottom squats: both tell you precisely were you should go. When I used to do some parallel squatting many moons ago I always felt like my depth was all over the place, especially when I would up the weight. Rock-bottoms solved that; always go down all the way, no matter what the weight. Same with box squats, they teach you to go nicely below parallel like a nice boy without having to think about where that is. Perhaps I won’t like the boxes as much when I up the weight, but I have a feeling I will. I’ll probably do some heavier squats on Monday, although still not anywhere close to max lifts since I’m strictly speaking practicing my technique (must? resist? the? temptation?).
Up next, DE Bench day tomorrow. The weather gods have promised more rain.
Readings on the box squat:
Squatting from Head to Toe by Dave Tate
Why you should box squat by Louie Simmons
Some box squat pictures